Tuesday, November 22, 2011

a quick update

I just stop by for a quick update...

The last couple of weeks have been incredibly busy, so busy I did not even have had a single day off in over a month! I have been working my regular job at the bakery, the time-share cafe, had some caterings and participated in the Eigengemaakt festival in Rotterdam, which was great fun! Eigengemaakt (homemade) is a festival where home producers can sell their homemade foods.


I had a stand with homemade sweets; a winter brownie, a brownie with rosemary and sea salt, lemon bar, carrot cupcakes and a pear frangipane. It was so nice to meet other people with the same interest in food and to get some really nice feedback on my pastries!

HubStairs, the time-share cafe I share with 5 other women has been a great place to try out some new recipes; I made a variation on the bread in the previous post and it worked out so well! I decided to use rye flour instead of spelt and added 250 grams currants to the existing recipe. The bread was served with goat cheese and homemade tomato jam. I also made loads of other stuff as well, but will share those recipes some other time...


Friday, November 4, 2011

The best homemade bread (and almond butter) ever!

While I am writing this, I am listening to the fabulous new CD of Florence + the machine, one of my favourite bands/singers. The sky is bright blue and it is about 17°C outside while we’re in November! This all makes me a very happy person, but what makes me even happier is this fabulous bread recipe with homemade almond butter.

Last week I bought a great book: Homemade by Yvette van Boven. This Dutch-Irish super creative woman (she did everything for the book herself, except for the pictures which are made by her husband) has made one of the coolest cookbooks I’ve ever seen! She tells you how to make everything from yoghurt and cheese to bread. The first recipe I tried from the books was the pan-baked bread.
I have to say that the measurements for the dough didn’t completely work for me, but with a bit of creativity it did, and worked out fantastic! My dough came out way to moist and sticky and I had to add a lot of extra flour (about 200-300 gram) to get it to the right consistency, but wait with adding extra flour until the dough has risen for the first time.   
The bread is baked in a big heavy based pan, such as a Le Creuset, to keep the moist and steam inside which helps to develop a nice and thick crispy crust.
It is a bit of a fuss with all the long rising times, but completely worth it! Just try!


425 gram flour (I used both spelt and rye flour)
1 tbsp vinegar
¼ tsp instant yeast
2 tsp salt
100 ml beer
200 ml water

Place all the ingredients in a bowl, whisk together with a wooden spoon until a ball forms. If the dough seems a little too wet, just add some more flour. Cover the bowl with cling film and leave to rest in a warm place for 8 to 18 hours. (I made mine before I went to bed, and left it in the oven at ± 40°C).
Place your dough onto a well floured surface and knead 10 times (if your dough is way too wet, like mine just add enough flour until you are able to form knead-able dough). Shape into a log and place onto a deep dish, which is covered with baking paper. Loosely cover with cling film and leave to rise for another 2 hours.
After 1½ turn the oven on at 200°C and place your (large) heavy-based pan (with the lid on top) into the oven.
When the dough is ready to be baked, you have to carefully make a few cuts on top, to help it rise. Now it is time to place it into the pan; lift the dough (including the baking paper) carefully into the pan and quickly place the lid back on top. You have to keep as much heat in the pan as possible.
Lower the temperature to 170°C and place the pan back into the oven. After 30 minutes you have to remove the lid and continue to bake it for another 20 minutes.
Now it is time to test your bread by knocking on its bottom; when it sounds hollow, it is done and you have to move it to a wire rack to leave it to cool.

I always thought it was impossible to bake your own artisan bread, but this recipe shows you it isn’t.
It makes your house smell gorgeous and instantly brings you into a good mood.
The bread can be eaten with everything, but I love mine with some homemade almond-maple butter.


2 cups raw almonds
4 tbsp maple syrup
A pinch of coarse sea salt
(Almond oil or another complimentary oil to taste)  

Preheat your oven to 150°C.
In the meantime you can combine the almonds, maple syrup and salt and spread it onto a baking sheet, covered with a baking mat or some baking paper. Roast the nuts 15 to 20 minutes, until they have just caramelised and are slightly crispy. Be careful to not over-roast them, or your paste becomes a little bitter.
Leave your almonds to cool for about 10 to 15 minutes.
Pour them into a food processor and blitz until the nuts have broken down into powder. Take the lid off and scrape down the sides. Blitz again and continue this process until you end up with a thick butter. To thin it a little and make it more spreadable, just add some almond or other complimentary oil while blitzing.
Pour into a jar and store in the fridge.


Friday, October 28, 2011

The last couple of weeks have been a true rollercoaster; work has been really busy, I have had a couple of catering assignments (and some more coming up), family coming over from Switzerland and of course my trip to Paris.
In the meantime I have also started a pop-up time-share café together with six other women. We have this café at a shop called the HubShop. This is a shop which sells eco-friendly and handmade goodies from small entrepreneurs.

We (the ladies from the café) are all food-lovers who now get the chance to promote ourselves and, own a little restaurant once a week.

Tuesday is in general my day. This means everything is made with spelt flour, the sweets are all lactose-free and the savoury dishes are cow’s milk free. I try to use organic and fair-trade products where possible.

Tuesday’s menu consisted of:

- Roasted pumpkin soup with black peppercorn and pecorino biscotti
- Leeks and goat cheese tartlets with a green salad
- Lemon poppy seed and almond cakes
- Chocolate chip peanut butter cookies

I will try to share my recipes every week with you...the photos probably won’t be of the best quality, but I’ll do my best :)

If you are in Rotterdam and would like to visit me or one of the other women at the café, this is the address: HubShop, Nieuwe Binnenweg 195B

Hope to see you soon!


Roasted pumpkin soup

1 pumpkin or squash, seeded, cleaned and cubed
1 tsp cumin seeds
½ to ¼ tsp nutmeg
8 sage leafs, finely chopped
Olive oil
3 onions, finely diced
½ bulb of garlic
1 liter vegetable stock (homemade of with 2 tsp. Of Marigold Swiss powder)
Salt and pepper to taste

Preheat the oven to 200°C.
Scatter your pumpkin and garlic on a baking tray and sprinkle with olive oil, salt and pepper to taste. Place in the preheated oven and bake for about 20 minutes until cooked.
Meanwhile; fry the onion, cumin seeds, sage and nutmeg in a little olive oil until softened.
Add the pumpkin and garlic (you can just squeeze it out of its papery skin) to the union mixture and fry for about 5 minutes on a low heat. Add the stock and bring to a boil. Leave to simmer for another 10 minutes.
Take the soup of the heat and puree with a hand-held blender until you end up with a silky smooth texture. Finish off with a little salt and pepper to taste.

Tuesday, October 25, 2011

Pecan biscuits and Paris

Lately I haven’t been as busy with the blog as I wanted to. I have had a well earned vacation and trip to Paris though...and it has been amazing! The weather has been great: sunny and not too cold. What else could you hope for? We stayed at the cutest apartment ever, in the Quartier Latin area and around the corner of Rue Mouffetard, which is a foodies’ paradise. There were bakeries with freshly baked baguettes, butcheries with the best dried sausages and spit roasted chickens, fresh fruits and vegetables everywhere and every other day a great market....


The breakfast ensemble in the picture is bought at ‘Le Petit Atelier de Paris’. A lovely little shop with a workshop inside; it is founded by two designers who make, design and sell their products in this little shop at the Marais district. They have wonderful products for a pleasant daily-life...and the cutest dog ever!

I will post some pictures and addresses of must-visit shops and restaurants sometime soon...

When I came back from Paris I immediately felt in need of baking something sweet, since it is almost impossible to find something sweet I am able to enjoy. Especially since the French love their cream and butter.
I just love nuts, and these pecan biscuits have a really nutty-flavour and aren’t too sweet.

Pecan biscuits

220 gram margarine
150 gram pecan nuts
50 gram fine Demerara sugar, plus 1 tbsp
300 gram spelt flour
Icing sugar, to decorate
Preheat the oven to 180°C.
Place the pecans on a baking tray and roast them in the preheated oven for 15 minutes.
Finely grind them with the tablespoon of sugar in a food processor. Leave them to cool completely.
Beat the margarine with the rest of the sugar until light and fluffy.
Fold in the flour, salt and ground pecans. Break of pieces of dough and shape into 3 cm balls. Place the balls onto a lined baking sheet and bake for 15 minutes until lightly golden.
Transfer the biscuits immediately to a wire rack and dust them with icing sugar.


Friday, September 30, 2011

A roasted vegetable tart

A terrible thing happened yesterday: my oven died! After 25 hard working years it just stopped. In between roasting peppers and baking mini quiches for a catering job (just to create some extra stress ;-)). As a fellow foodie I don’t have to tell you how annoying it is not being able to bake, roast or grill anything anymore....

But just a couple of days before this happened I made this delicious vegetable tart:


For the tart case (makes enough for 3 tart cases):
500 gram spelt flour
½ tsp salt
250 gram margarine
1 egg yolk
250 ml cold water
For the filling:
1 small courgette (zucchini) or ½ large one
1 small aubergine (eggplant) or ½ large one
200 gram pumpkin
2 red onions
150 gram or a large handful cherry tomatoes
2 tbsp olive oil
2 tbsp chopped herbs to taste (I used rosemary, thyme and oregano)
150 gram soft goat cheese
150 ml soy milk
2 eggs, beaten
¼ tsp bouillon powder
Salt and pepper to taste

Put the margarine, flour and salt into a food processor and pulse until you get a fine crumb.
Place the mixture into a large bowl and make a well in the middle. Add the egg yolk and half of the water. Quickly combine the wet and dry ingredients using a fork, if necessary add more water.
If you aren’t able to use the fork anymore, start using your hand to bring the dough together into a ball. Flatten the dough into a disk, wrap in Clingfilm and leave to rest in the fridge for at least 30 minutes up to 8 hours.
Preheat the oven to 225°C.
When the dough is chilled, roll it out (2 mm) onto a floured surface to fit your preferred tart pan.
Place the dough into the prepared pan, trim the edges and refrigerate for 30 minutes.
Meanwhile you can start preparing the roasted vegetables.
Chop all the vegetables, except for the tomatoes, into 2 cm dice and place onto a roasting tin. Add the tomatoes and sprinkle with olive oil, salt and pepper to taste and the herbs. Place into the oven and roast for about 25 minutes until cooked. Remove from the oven and leave to cool.
Lower the oven temperature to 175°C.
Blind bake the tart case for 30 minutes. Remove the baking beans and parchment paper, give the pastry a quick egg wash and bake for another 5 minutes.
Start making the custard by mixing the soymilk, eggs, salt and pepper to taste and bouillon powder.
Arrange the vegetables at the bottom of the tart case, pour over the custard and crumble over the goat cheese.
Bake 30-35 minutes at 175°C or until the filling has set.
Eat while still warm.

Saturday, September 17, 2011

Lemon poppy seedcakes


Lemon poppy seedcakes are one of my all time favourites; I just love everything that includes lemon and the poppy seed gives it such a nice texture and flavour.

I found the pastry moulds I used while cleaning the kitchen and instantly fell in love with them. They just begged me to be used for baking lemon poppy seed cakes...;-)

My normal recipe asks for yoghurt, which is lovely but makes the batter quite sticky and hard to use in a mould like this. My favourite lemon cake recipe uses ground almonds, which gives it a lovely flavour and texture, but makes it rather dense. That’s when I stumbled across this Jamie Oliver recipe, which I adjusted to fit my diet, and gives you a lovely light cake, with a moist centre and sour, slightly crunchy top. Perfect!


For the cakes (makes about 12):
115 gram margarine, softened
115 gram caster sugar
4 eggs
125 spelt flour
180 gram almond flour
2 tsp baking powder
¼ tsp salt
Zest and juice of 2 lemons
40 gram poppy seed
For the lemon syrup:
100 ml lemon juice
100 gram caster sugar
 
For the icing:
1-3 tbsp lemon juice
150 gram icing sugar

Preheat the oven to 175°C.
Whisk butter and sugar with an electric mixer until light and fluffy, for about 3 minutes. Add the eggs one by one, adding the next one when the previous one is fully incorporated.
Whisk in the lemon juice and zest, flour, salt, almond flour, poppy seeds and baking powder. Be careful not to over mix.
Divide the batter in 12 baking moulds/cups and bake for about 15 minutes.
While the cakes are baking start preparing the syrup.
Pour the lemon juice and sugar into a small saucepan and heat over medium heat until the sugar is dissolved. Remove from the heat.
When the cakes are done, remove them from their cups (unless you are making cupcakes), place onto a wire rack and make some holes in the top with a skewer. Pour over each cake about 1 tsp syrup.
When the cakes are cooled down you can start icing them. For the icing you just need to combine the lemon juice with the icing sugar until you get the preferred taste and consistency.
Pour over about 1-2 tsp icing and leave to set.


Wednesday, September 7, 2011

Lemon bars

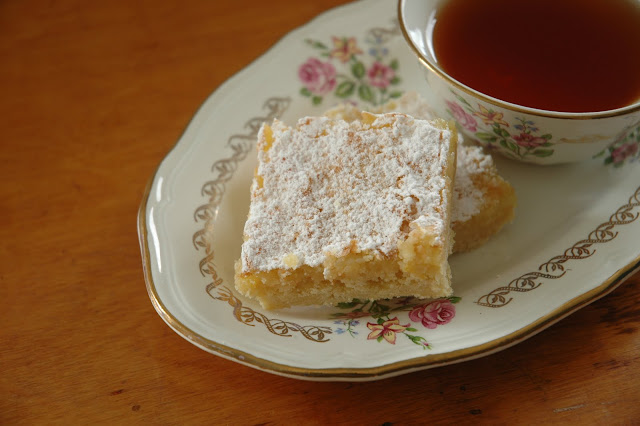
I’ve been planning to make these lemon bars for months, but due to some stupid dietary restrictions (no soy products and no fruit) I wasn’t able to do it before. Last week, when I heard I was allowed to eat soy and fruits again, I was ecstatic! Never knew life would be so horrible without them! So since last week I’ve been baking non-stop to try out all the recipes I wasn’t able eat before...These lemon bars where nr. 1 on the list and absolutely worth the waiting!


For the shortbread base:
280 gram spelt flour
225 gram margarine
80 gram icing sugar
1 tsp salt

For the topping:
35 gram flour
350 gram sugar
Juice of 2 lemons
Zest of 1 lemon
1 tsp baking powder
4 eggs
Icing sugar for dusting

Preheat the oven to 180°C.
Grease a 25cm square baking tin and line with baking paper. 
Put all the ingredients for the shortbread base in a food processor and blitz until the mixture just comes together in a ball. Be careful to not over mix or the dough will be too sticky. Press the dough into the tin and bake 20 to 25 minutes, until golden. Remove and let cool slightly. Leave the oven on.
Meanwhile prepare the topping. Whisk together the eggs, sugar and lemon juice, then whisk in the flour and baking powder. Mix well and make sure there are no lumps in the batter. Add the lemon zest.
Pour the mixture over the shortbread base and bake until set, about 15 to 20 minutes
When is has cooled completely, loosen the edges with a knife and remove from the tin. Dust with icing sugar and cut into 12 bars.

Sunday, September 4, 2011

A striped beetroot and apple salad


We’ve had some strange weather over here in Holland; it’s gone from autumn rain and cold to summer sun and heat. This confuses me a bit, especially in the kitchen. On Monday I was in the mood for ‘stamppot’, a typical Dutch autumn/winter dish and yesterday it was 25°C again, which made me crave something crisp and fresh like this salad.

I think it is a perfect salad in between the seasons.
The vinaigrette is sweet and slightly tart, which combines well with the earthy beetroot and crisp Delcorf apples. Which are the first apples of the season and also my favourite. The almonds give it a nice crunch, while the feta cheese balances out the dish with it’s saltiness.

3 medium striped beetroot, peeled
2 small apples, preferably Delcorf or Elstar, cored
100 gram feta cheese, crumbled
Small handful maple almonds, finely chopped
2 tsp raspberry vinegar
3 tbsp lemon oil
Salt and freshly ground pepper to taste
A small handful of basil leaves
For the maple almonds:
1 cup raw almonds
2 tbsp maple syrup
For the lemon oil:
Peel of half an organic lemon
250 ml olive oil
Start by making the maple syrup glazed almonds.
Preheat the oven to 150°C.
Mix the almonds with the maple syrup, making sure all the almonds are covered with a thin layer of syrup. Spread on a baking sheet, lined with parchment paper, and place into the oven. Bake the almonds during 20 minutes until they are nicely golden and crunchy. Cool.
For the lemon oil; put the oil and lemon peel in a small saucepan and heat on a low heat for 10 minutes. Strain out the peel and leave to cool.
To make the vinaigrette pour the oil, vinegar and some salt and pepper to taste into an empty jar and shake well.
Thinly slice the apple and beetroot with a mandoline.
Place the slices of apple and beetroot with half the amount of vinaigrette in a large bowl and carefully toss with your hands. Every slice should be covered with a nice thin layer of dressing. Transfer to a nice serving platter and sprinkle over the feta cheese and almonds. To finish of the dish, sprinkle over the basil leaves and the remaining vinaigrette.


Tuesday, July 26, 2011

tomato and roasted pepper soup with tomato and basil focaccia


Since the summer in Holland is dreadful I needed something to cheer me up! We have had this autumn like weather for weeks now. The only way to let the sun shine is on your plate...and this tomato soup does the trick for me. Combined with the focaccia (which makes your house smell amazing) it gives you the exact amount of comfort without making it to autumn-y.  

Tomato and roasted pepper soup

2 tablespoons of tomato paste
2 kilo pomodori tomatoes
1 kilo red bell peppers
1-2 red chillies, deseeded
2 cloves of garlic
2 tablespoons olive oil
600 ml vegetable stock
Sea salt and freshly ground pepper

Preheat your oven and grill to 300oC.
Half you peppers lengthwise and deseed them. Place onto a baking sheet covered with baking paper.
Place the sheet into the oven and grill for about 15 minutes, or until the skins have become black and blistered. Now place the peppers into a bowl and cover with cling film.
While the peppers are cooling down score in the back of the tomatoes and blanch them for about 20 seconds in boiling water. Now you should be able to take the skins of easily.
Roughly chop the tomatoes and set aside.
Peel the peppers and slice them up into 2 cm squares.
Finely chop the chillies and garlic.
Place a heavy bottomed pan onto the stove and pour in the olive oil.
Put in the garlic and chillies and fry for about a minute. Now add the peppers and tomato paste. Place a lid onto the pan and let simmer for about 15 minutes. Add the tomatoes and let it simmer for 15 minutes.
Pour in the stock and bring to a boil. Turn the heat down and let it simmer for another 15 minutes.
You can make it a little more smooth using a hand-held-blender, or just leave it the way it is.
If you like drizzle in some good quality thick and syrupy balsamic vinegar or some basil oil to add an extra dimension, but it is already good as it is...


Tomato and basil focaccia
15 gram fresh yeast or 10 gram dried yeast
15 gram honey
3 dl lukewarm water
400 gram spelt flour
100 gram fine ground corn flour or polenta
15 gram sea salt
Extra flour and polenta for dusting
4 to 6 tbsp basil oil
About a handful cherry tomatoes

Dissolve the yeast and honey in halve of the water.
Heap up the flour, polenta and salt and make a well in the middle.
Pour in the yeast mixture and mix in using one hand until everything is incorporated.
Now mix in the remaining water until everything is incorporated and you end up with smooth dough.
Now the kneading begins! Knead the dough for about five minutes.
Dust your workface with polenta and shape the dough into a ball and place it on a baking sheet.
Score the dough with a sharp knife, so can relax and rise faster.
This is the first time you will let the dough rise and it should double in volume. To maximise this effect you can cover the baking sheet with cling film that you have brushed with a little olive oil to prevent sticking. Place it in a warm and draft-free area. I prefer the warming compartment of the oven.
The dough will need to rise 40 to 90 minutes until it has doubled in volume.
When the dough is ready, beat and knead out all the air for about a minute.
Now it is time to grab your rolling pin and roll the dough out into a 1 ½ cm thick piece. Transfer the dough onto the baking sheet.
Spread the basil oil onto the dough. ‘Dimple’ the dough with your fingertips, making sure you don’t press all the way to the bottom. You can put your tomatoes whole or halved into these ‘dimples’.
Cover with a clean tea towel and let it rise for another 45 minutes or until it has doubled in volume.
Preheat your oven to 250oC.
Place the baking tray carefully into the oven and bake the focaccia during 15 to 20 minutes golden and brown.
*When you like your focaccia a little moister, just add about 4 to 6 tablespoons of olive oil to the last batch of water.


Basil oil
A good two hands full of basil leaves
8 tablespoons of olive oil
A pinch of salt
Crush your basil leaves with a sprinkle of salt in the pestle and mortar or in a food processor.
I prefer to do it in a p&m because it gives a more fragrant result.
Add the oil and combine to a nice and fragrant basil oil.

Wednesday, June 15, 2011

Peanut butter


I just love peanut butter and especially on a nice of slice sourdough spelt bread or a homemade bagel...
I think homemade peanut butter tastes way better than the shop bought stuff, so here is my recipe:

600 grams of shelled peanuts
1 teaspoon sea salt
1 – 2 tablespoons peanut or sunflower oil

Place the peanuts and salt into a food processor. Process until the peanuts form a smooth and shiny ‘ball’. Continue to process while adding the oil, one table spoon at the time. The mixture now should be smooth and spreadable.

Place the peanut butter in an airtight container and it will keep well for about two months in the fridge.

Enjoy!